
How I made a Daft Punk Helmet
I’ve been a Daft Punk fan since I can remember - my earliest memory of enjoying the Daft beats is as a kid in the backseat of my cousin’s suburban while he drove us all kid cousins to the drive-through ice-cream (yes, there is such a thing in Monterrey). It was ‘Around the world’ and I will never forget how much I liked that song and how it would later change my world.
Fast forward to April 2018, while visiting my mom in Mexico, I had the idea to make a Daft Punk helmet for my trip to Maker Faire. It was my first time attending Maker Faire and I thought that everyone was supposed to make and bring something 🤷🏻♀️.
As soon as I got home, I started scouting for all the parts I would need. I gave myself 28 days to finish the helmet and spent the first few days turning my loft’s kitchen-living-room area into a lab while I waited for the 3D printer I had ordered.

3D printing the helmet
Stuff I used: PLA
I chose Guy-Manuel de Homem-Christo’s helmet because it is my favorite helmet out of the two and seemed the most challenging one to make with the giant visor.
I found @bendiger’s files from thingyverse, sliced them all up, and started printing. There are 58 parts to make this helmet (including the visor) and each part took 2.5 hours on average to print. Totaling in 136.5 hrs (if all prints had been successful) of printing time.


Building the helmet
Stuff I used:
The prints came with bits in the back so you can zip tie them together, so once I was done printing, I put all the parts together with zip ties.

While the zip ties worked to keep the parts together, it wasn’t sturdy. So I added epoxy to bind all the parts together and make it harder and sturdier.
I had to hold the parts together with clamps overnight to allow the epoxy to cure. And then I sanded the epoxy with a Dremel.

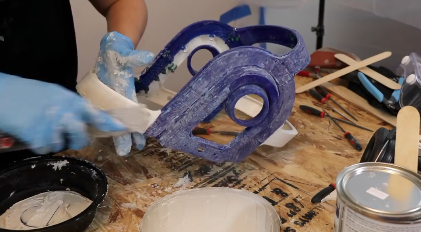
Then I applied Bondo to it to make it super smooth. I learned that you have to do as thin as layer as possible and do small batches of Bondo as it dries super fast. Probably the worst advice so don’t follow it, but the best / easiest way I could apply the bondo was with my fingers. Do it at your own risk.

When it came to sanding, I tried the orbital sander, but after I primed it, I realized that I should’ve done it by hand since the orbital sander made dips.
When hand sanding I went from 220 grit, stopped at 500, did some priming. The priming exposed more dips, kept sanding, priming, sanding. Then I used Bondo putty to fix dips and continued sanding all the way to 1200 grit.
I think sanding took 80% of the time to build this helmet.


I had to wear long sleeves the next day at work because my arms had black paint all over them ROFL
I decided to paint the helmet black since it is my favorite color and also I knew that I would not be able to achieve the original chromed gold look with the budget and tools I had at home. And black IS my favorite color :)
making the visor
Stuff I used for the vacuum forming rig:
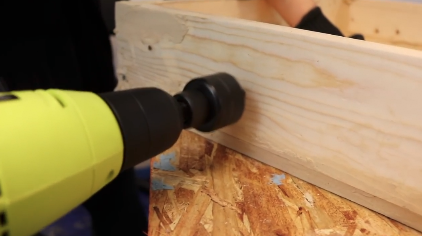
One 1” x 4” x 8’ pine board for the frame and sides of the box
One 2’ x 2’ BCX plywood for the bottom of the box ($6 at home depot)
One 48” x 24” Pegboard for the top of the box
Jig Saw (I borrowed one from my friend)
Bucket vacuum (I also borrowed this)
The visor material:
I had the 3D printed, bondo-ed, sanded, and primed visor perfectly smooth and ready. So I made the vacuum forming rig - which was just a box with holes on top attached to a vacuum.

The visor mold is placed on top of the box, the vacuum is attached to the box, the frame with the plastic is heated and placed on the mold to make the clear visor.
To make the vacuum forming rig, I first measured my kitchen oven as a baseline since I was going to use that as a means to heat the plastic. This is probably dangerous so keep good ventilation around you and make sure you don’t melt your plastic inside the oven (like I did).
Once I had the dimensions, I cut the plywood and board to make a box (left the top open). I used wood glue to bind them together, clamped and waited 24 hours, and then added plastic wood to the joints to make sure it was sealed. I let it cure for another 24 hours.


Then I made a hole that would fit the vacuum hose.

Finally I glued a peg board on top of the box. I sealed it with foil tape. I then glued 1’ foam strips (that was part of the 3D printer packaging) along the edges to make sure I would make a seal when placing the frame on the box.


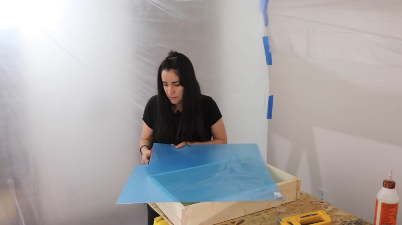
Then I made the frame with the reminder of the board. I glued and clamped it together and let it sit for 24 hrs. I measured and cut the petg sheet, and stapled it on the frame. I suggest removing the blue protective sleeve in a clean environment since it attracts dust.

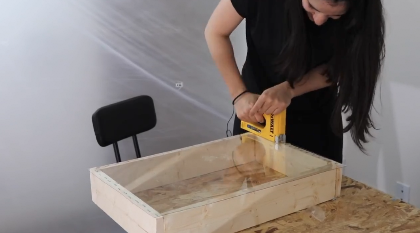
This is the tricky part. And this is what worked for me (after 4 tries). I heated my oven at 350 degrees, put the frame with the petg in it for about 3 mins. I left the oven door open so I could see how much the plastic was sagging.
The visor mold was already on the pegboard side of the box, and I had the vacuum already on since you have to be super fast when placing it over the mold.
After the 3 mins in the oven I took out the frame with the petg, flipped, and immediately put it on the mold, the vacuum sucked all the air and I had my visor! The vacuum rig worked really well :) I should emphasize that YOU HAVE TO BE VERY FAST during this step. The plastic cools down fast.


Placing it!

Perfect visor after the 4th try

I was very happy with the result
tinting the visor
Stuff I used:
I used the car lens tint for the visor. I sprayed on the outside, not sure which way is better, but I really liked how it looked after I applied the clear enamel coat. It was very shiny and dark and you can’t see the insides, but I could see through it, and the LEDs shined through it :)

Applying the lens tint

Applying the clear coat
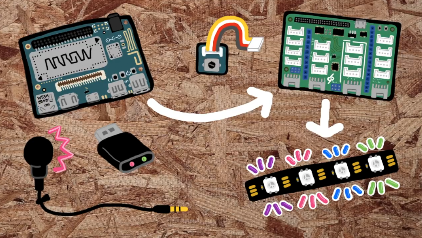
My drawing of the parts

The actual parts!

This is how I stacked all the electronics

Wired
Disclaimer! I used a Dragon Board and a Mezzanine sensor board, because I wanted to try them. You don’t have to use the same stuff as I did - this can be done with any microcontroller or mini computer.
I cut the LEDs in sets of 4, placed them in the 3D printed containers and soldered them together.


The Dragon boards takes 12V and the LEDs 5V so I used a voltage regulator to bring the voltage down. I used a protoboard to put everything together, including the port to the battery, and the voltage regulator. The Dragon board has a USB port so the USB sound card and microphone were pluggable. And the pot came with the mezzanine board so it was also pluggable.
The code
I flashed Debian into the Dragon board so I had a full Linux computer, the sensor board is basically like an Arduino that interfaces with the Dragon board.
I wanted the LEDs to light up to sounds and music. So I wrote a python script that processes the sounds and the sound levels which are then sent through serial to the Mezzanine board (mic -> serial -> mezzanine -> LEDs). I sent the bass and treble values to light up the LEDs with sounds.
Python script: https://github.com/estefanniegg/YouTube/blob/master/builds/daft_punk_helmet/dragonboard/microphone_to_serial.py
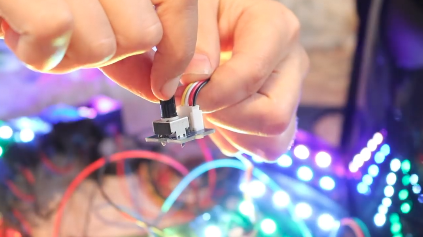
I programmed different rainbow patterns and flashed those to the mezzanine board. I did 8 different modes. 5 rainbow pre-programmed patterns and 3 sound modes. The Mezzanine also interfaces the potentiometer to the Dragon board. The pot is the switch to control the different modes.
Mezzanine code: https://github.com/estefanniegg/YouTube/tree/master/builds/daft_punk_helmet/mezzanine

connecting it to my phone
A few months later I took the helmet to Supercon and since I had a full Linux computer in it, I added functionality! :)
I wrote a website and hosted it in the Dragon board. I connected the board to my phone’s hotspot so they would be on the same network and I could access it through my phone.
The website has a color picker so I could change the colors with my phone, I also added a tiny speaker to the helmet (plugged to the USB sound card already being used for the mic). The speaker is inside of the helmet so I can play Daft Punk music inside the helmet.
So I added a play button on the website and I put about 6GB of Daft Punk music in the Dragon board. So it is like a very old iPod.
*I will add the website’s code to my GitHub soon, I promise.
Helmet Details
Old school button caps (from my local electronics shop)
I used the wire rainbow ribbon to decorate the back of the helmet. And the button caps were for the sides. Everything, and I mean everything left, was put together with a glue gun.
The battery pack is placed inside on the back of the helmet, the boards on the left side, the LEDs to the front, the pot is at the bottom front close to the microphone, the speaker is by the boards.


Finished it off 2 hours before Maker Faire!


People stared. I stared back but they didn’t know.

I was very pleased with my helmet.
I hope this blog is useful, please please let me know if you make one, I would love to see how they turn out. Keep scrolling for extra videos on the helmet. Aaaaannd…
….YES, Daft Punk did change my world. Thanks to this project, I got to meet amazing YouTubers like Joel Telling (3D Printing Nerd, who made a video where he showcased my helmet!), I got an interview with Make Magazine during Maker Faire, I got invited to speak at Hackaday Supercon and Maker Faire Miami because of it. This helmet has traveled to San Francisco, NYC, Miami, and LA.
I worked on this project because of my love for Daft Punk, and now that they’ve separated, I am thinking about making the Thomas Bangalter’s helmet next as a last tribute ~