
How to back up to the cloud for free
Do you want to feel productive while #selfisolating but you don’t feel like doing anything? I got you. I am going to show you how to store all your photos and videos from any device to Google Photos for free, at original quality (which is the best you can get) with just one line of code. Anyone can do this. Ok, anyone with a Pixel phone can do this (which are still for sale online at only $78 ;)).
If you are visual like me, here is the how-to video:
Story time
As a content creator, I take a lot of photos and videos everyday with my phone and my DSLR. I have a 10TB NAS (Network-attached storage) drive at home to I store all my videos and photos, but I have no access to it when I travel and I need redundancy since I have had many hard drives fail on me. So I started looking into buying (subscribing to?) a cloud service.
Out of the 10TB of my NAS, I have used 7TB in one year. That means I would need way more than 10TB in any cloud service. Here is what I found:
Google One
10TB for $99.99/ month and it includes all of the Google apps. But as I said, I need more than 10TB
30TB is $299.99 / month also Includes all the Google apps. And wow that’s expensive for not that much more storage..
G Suite
Unlimited Drive storage for $12 /month. This is not too bad, as I could use Drive as storage. But I wouldn’t get all the good stuff from Photos with this option. This would be like a web version of my NAS.
iCloud (IMO this one is the worst option)
2TB $9.99 / month. That’s it, no más. So, if you are a creator like me, you’d have to contact Apple Business as a “small business” to negotiate a plan… I bet iJustine gets this one for free.
As of early 2020, it seemed like all the cloud services available to a small creator like me are too much money and not enough storage. Let’s overly-engineer this!
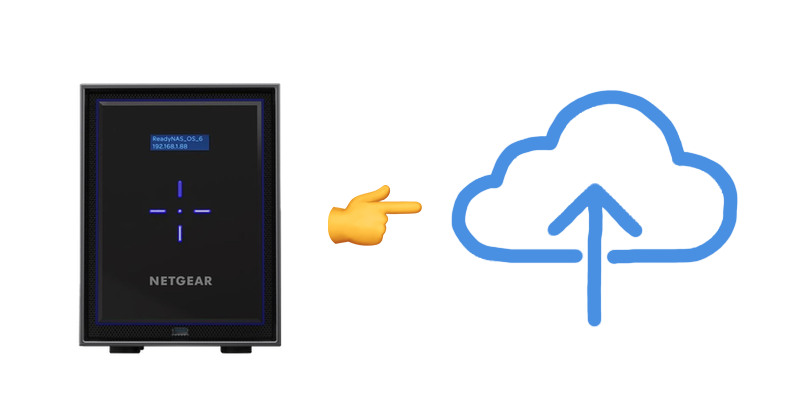
I made this picture to show you what I wanted to do because I am visual.
I found a loop hole. A big one.
In 2016, the very first high-end Google designed, developed, and marketed Pixel phone came out. This phone had the best performance and cameras (yes, plural) and included FREE UNLIMITED STORAGE AT ORIGINAL QUALITY FOREVER. So naturally, I got it. This was my first super expensive and nice phone. At unlimited storage forever, I thought I’d hit the jackpot. I told my co-workers and friends about it, but no one was as impressed about this feature as me.
A few years later and a few phones later, I had to get an iPhone. Yes, I said had. I am an Android person at heart, but as a content creator who gets paid partnerships on Instagram, I couldn’t afford the constant Instagram bugs that exist in the Android version of the app. One time I had to download a couple of stories to my Pixel 3 phone, send it to me as an email, which ended up being links on Drive since they exceeded the max 25Mb, then find my old iPad from 2012 to download the stories from Drive, and upload them to Instagram from the iPad. Why? because the iOS version of the Instagram app did not have the Android bug (this bug wasn’t fixed for over a week leaving android users like me unable to do any type of “Swipe ups” or tagging a partner on stories).
“ESTEFANNIE GET TO THE POINT, GIVE ME THE FREE STORAGE!”
I promise it is all connected! Remember how the first pixel has FREE UNLIMITED STORAGE AT ORIGINAL QUALITY FOREVER? Well, I’ve been enjoying this since 2016 and continued to do so with the Pixel 3. I am very spoiled when it comes to phone back ups. So I decided to figure out a way to use (abuse?) my Pixel’s unlimited storage to back up my iPhone data, and while I was at it, why not everything else? As we learned, clouds are expensive, so let’s do this! (I hope Google doesn’t read this, AHAHAH who am I kidding? They probably have been reading this as I type)
Here is how to get free unlimited storage at original quality.
You are going to need:
Pixel Phone 1 (still for sale online at only $78 ;))
A computer
A USB to USB-C cable
Note: The unlimited storage is hardware based and is not attached to any Google account. This means that you have to move all your files into the Pixel phone to get the unlimited storage. This also means that you can switch to as many Google accounts as you want to store your data!
Setting up your computer
Note: These steps are for Apple computers.
Install Homebrew. This is to install all the stuff that apple didn’t to my computer. All you need to do is run this command in the terminal:
$ /bin/bash -c "$(curl -fsSL https://raw.githubusercontent.com/Homebrew/install/master/install.sh)"
2. Install adb (Android Debug Bridge). This is a tool that allows you to run commands on an Android device:
$ brew cask install android-platform-tools
Setting up your Pixel
Connect the Pixel via USB to your computer
To turn your phone to developer mode, go to:
Settings / About phone
Scroll down and at the bottom you will find Build number. Tap on Build number a bunch of times (like 7 times) and you will get a notification that you are now a developer!
Now you need to turn on USB debugging to access your phone through your computer via USB. Go to:
Settings / System / Advanced / Developer Options
Scroll down and turn on USB debugging
Confirm “Ok” on the pop-up to allow USB debugging.
We are ready to transfer files to the Pixel
Moving all your media from iPhone to the Pixel
Apple gives to all of their iPhone customers 5Gb of free iCloud. So let’s use it and let all your iPhone photos and videos back up to the iCloud until it is full.
Apple links iCloud to the photos app in my computer. And this is where all the files are. As long as they are in the computer I can move them.
When you are running low on iCloud space (you’ll get a notification on your phone and your computer and it will annoy you until you decide to back up your phone), plug your Pixel phone to your computer via USB
Copy the bash script below into a text file and save it as something.sh:
# #!/bin/bash
#Location where iCloud stores media in your computer
cd ~/Pictures/Photos\ Library.photoslibrary/Masters
#Get all the media of any type from all the folders within folders and move to a
#folder that you created in your desktop. This is not necessary but helps seeing
#how many files we are moving into the Pixel
find . -maxdepth 20 -not -type d -exec cp '{}' ~/Desktop/Cloud_backup/PIXEL/ \;
#Move all the files into a new folder in the Pixel phone
adb push ~/Desktop/Cloud_backup/PIXEL/* /sdcard/iphonePhotos
5. Run something.sh in the terminal
$ ./something.sh
6. You are done!
All of your files have been moved into the Pixel phone. Now we need to turn on the “Back up & sync” on the new folder (you only need to do this once):
In the Pixel, open the Photos app
Tap on the hamburger menu on the left side
Go to Device Folders
Find the new folder
In the folder, turn on “Back up & sync”
All of the files in this folder will back up to Google photos!
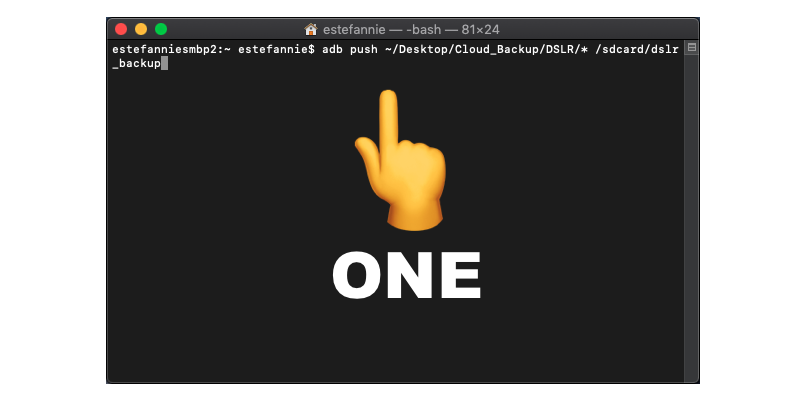
Moving any media (DSLR etc) to the Pixel
This one is way easier.
Move whatever you want to back up in a folder on your Desktop
Run this in the terminal:
$ adb push ~/Desktop/Cloud_Backup/DSLR/* /sdcard/dslr_backup
And you are done! All you have to do is make sure the folder in the Pixel has “Back up & sync” on.
See?! One line of code, you can run this and binge watch Tiger King while the Pixel uploads to the cloud.
Verify
If you want to verify that your photos and videos were not compressed and that this upload did not count against your storage quota:
To see how much storage you have left in your Google account, go to Google One. This is where you can verify that all the stuff that you uploaded from your Pixel to Photos did not count against your storage (woohoo!). Don’t forget that you can switch accounts in your Pixel and upload to any Google account.

To check the quality of your photos and videos. Go to Photos, and click on any of the new uploaded photos, then click on the info button at the top.

Now, you can see all the information about your photos or videos and can that your photos and videos were not compressed and are all still at original quality. Yay!!
This photo was taken with my DSLR and is being stored at 24MP - it’s original quality.

This video was taken with my iPhone at 4k and it is still 4k (3840 x 2160)!!

Original quality vs high quality
“But Estefannie, I get unlimited storage at High quality on Google photos straight from my iPhone, why would I want to do this?!”
The importance here is to know the difference between High Quality and Original Quality. When you upload your media at High Quality, all your photos are compressed to save space.
At High Quality:
Anything higher than 16MP will be compressed to 16MP and videos over 1080p will be compressed to 1080p.
At Original quality:
Nothing is compressed
If you don’t care that your media is being compressed, by all means, go for high quality. But if you are like me and need to store 4k videos of your cat, then hack away! Yay loop holes!
Code on,